Introduction to the Loomis Method
Are you ready to elevate your drawing skills? The Loomis Method might just be the key to unlocking your artistic potential. Developed by Andrew Loomis, this technique has helped countless artists master proportion and anatomy, paving the way for more dynamic and realistic drawings. Whether you’re a beginner aiming to grasp the fundamentals or an experienced artist looking to refine your craft, understanding the Loomis Method can transform how you approach figure drawing. In this guide, we’ll break down each step of this powerful method, offering tips and insights that will have you sketching with confidence in no time! Let’s dive into the world of proportions and shapes that make up our beautiful human form.
Understanding the Importance of Proportions
Proportions are the backbone of realistic drawing. They help create harmony and balance in your artwork. Without them, figures can look distorted or unnatural.
Understanding how different parts relate to each other is crucial. For example, in human anatomy, the head typically measures one-eighth of a person’s height. This simple rule guides your sketches and ensures they reflect reality more accurately.
The Loomis Method emphasizes this aspect by breaking down complex forms into manageable shapes. It encourages artists to observe and measure relationships between body parts meticulously.
As you practice these proportions, you’ll notice improvements in accuracy and depth. The more familiar you become with basic ratios, the easier it will be to innovate within your style while maintaining realism.
Learning the Basic Head Construction
Understanding the basic head construction is crucial for any artist. The Loomis Method simplifies this process into manageable steps.
Start with an oval shape to represent the skull. This serves as your foundation. From there, divide it vertically and horizontally to establish symmetry. These guidelines help in placing features accurately.
Next, define the jawline by adding a box at the bottom of the oval. This will give structure to your drawing and make it more three-dimensional.
Once you have these basic shapes down, it’s time to refine them further. Pay attention to proportions between different facial elements like eyes, nose, and mouth.
Practice sketching various angles of heads using this method. Each attempt improves your understanding of form and perspective while enhancing your artistic skills significantly.
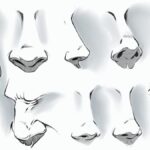
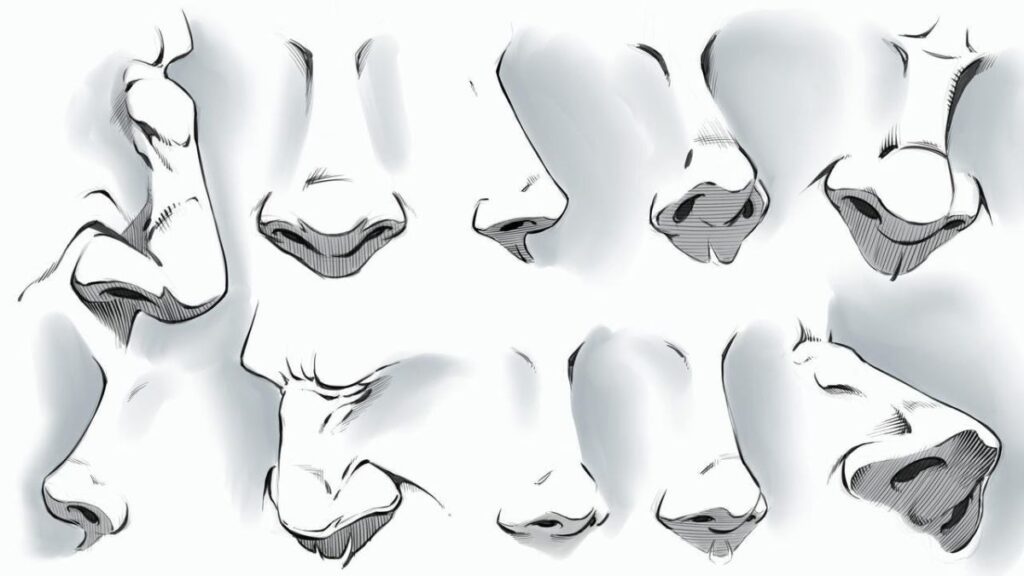
Adding Facial Features and Details
Once you’ve established the basic head structure, it’s time to bring your character to life by adding facial features. Start with the eyes. They are often considered the windows to the soul and can convey a range of emotions.
Position them correctly on your head shape. A common guideline is that they sit about halfway down the overall height of the head. Use simple shapes as placeholders before refining their details.
Next comes the nose, which varies significantly in form and size across different characters. Focus on its placement; center it between your eyes while considering angle and perspective.
Don’t overlook lips—they define expression too. Sketch lightly at first, adjusting width and fullness based on character traits or mood.
Think about hair texture and style. It frames your face and adds personality, so experiment until you find what feels right for your drawing!
Mastering Figure Drawing with the Loomis Method
Mastering figure drawing is a rewarding journey, and the Loomis Method offers a structured approach to tackle it. Start by breaking down the human form into simple shapes. This foundational step helps you visualize proportions accurately.
Focus on gesture drawing to capture movement and flow. Quick sketches can help you understand how weight shifts within different poses. Once comfortable with gestures, gradually refine your drawings by adding details.
Use Loomis’s guidelines for limbs and torso construction to maintain balance in your figures. Practice consistently; each sketch enhances your muscle memory and confidence as an artist.
Don’t forget to study anatomy alongside this method. Understanding underlying structures will elevate your figure work from basic forms to lifelike representations. Embrace experimentation, allowing yourself to explore various styles while adhering to Loomis’s principles for consistency in performance.
Tips for Using the Loomis Method in Different Styles and Mediums
Experiment with various styles while maintaining the Loomis structure. Whether you prefer realism or anime, start with the foundational shapes that Loomis provides. They set a solid base for any artistic direction.
When working in different mediums, adjust your approach accordingly. For pencils and charcoal, focus on shading techniques to enhance depth and dimension using Loomis’s guidelines. With digital art, leverage layers to refine proportions easily.
Don’t shy away from mixing styles! The versatility of the Loomis method allows you to blend realistic features with abstract elements seamlessly. This fusion can create unique character designs or dynamic poses.
Practice regularly across different mediums—watercolor, ink, or even sculpture—to understand how each one interacts with the principles of proportion and form outlined by Loomis. Embrace experimentation; it fuels creativity and broadens your skillset significantly.
Common Mistakes to Avoid when Using the Loomis Method
Many artists stumble when using the Loomis Method due to common pitfalls. One frequent mistake is neglecting the foundational shapes. Rushing through this step leads to imbalanced figures and distorted proportions.
Another issue arises from over-reliance on guidelines. While they help in constructing forms, sticking too rigidly can stifle creativity and personal style. Remember, these lines are tools, not rules.
A lack of practice with different angles often trips up beginners as well. Drawing from a single perspective limits your understanding of three-dimensionality.
Some may skip refining their sketches after initial construction. This hasty approach can miss details that bring life to your work. Take time to add finishing touches—they make all the difference in quality!
Resources for Further Practice and Improvement
For those eager to deepen their understanding of the Loomis Method, a variety of resources can greatly enhance your practice.
Books are an excellent starting point. Andrew Loomis’s own titles, such as “Drawing the Head and Hands,” provide invaluable insights and step-by-step guidance.
Online platforms also offer a wealth of tutorials. Websites like Proko feature video lessons that break down complex concepts into digestible segments.
Art communities on social media serve as great support systems. Joining groups focused on figure drawing can help you receive constructive feedback from fellow artists.
Don’t overlook local workshops or classes. Engaging with instructors in person allows for hands-on learning and immediate critique, which is essential for growth.
These resources cater to different learning styles, ensuring there’s something for everyone looking to master this method.
Conclusion
The Loomis Method is a valuable tool for aspiring artists. It provides a structured approach to drawing, focusing on proportions and form. Mastering this method can significantly enhance your skills and confidence as an artist.
As you embark on your journey with the Loomis Method, remember to practice consistently. Each step builds upon the last, so take your time with head construction before moving onto figure drawing. Don’t hesitate to experiment with different styles and mediums; the versatility of this technique allows for personal expression.
Avoid common pitfalls like neglecting proportions or rushing through details. Instead, focus on refining each aspect of your work until it feels right.
With dedication and perseverance, you’ll find that the Loomis Method not only improves your technical ability but also enriches your artistic vision. Keep exploring resources and continue honing your craft—it’s all part of growing as an artist!